

 The venerable flushing toilet. A miracle of engineering, a marvel that revolutionized sanitation and improved health of most living in developed areas. Yet, it is one of the things we least think about, that is, until it breaks.
In a departure from the norm, although, still strictly within the realm of what a practical engineer-minded person might take on, this post concerns itself with a troublesome toilet cistern.
Before we go any further though – if you don’t want to see anything gruesome and dirty, look away now. Don’t read any more of this post, call a plumber and fork over the cash.
The Patient, and the Diagnosis
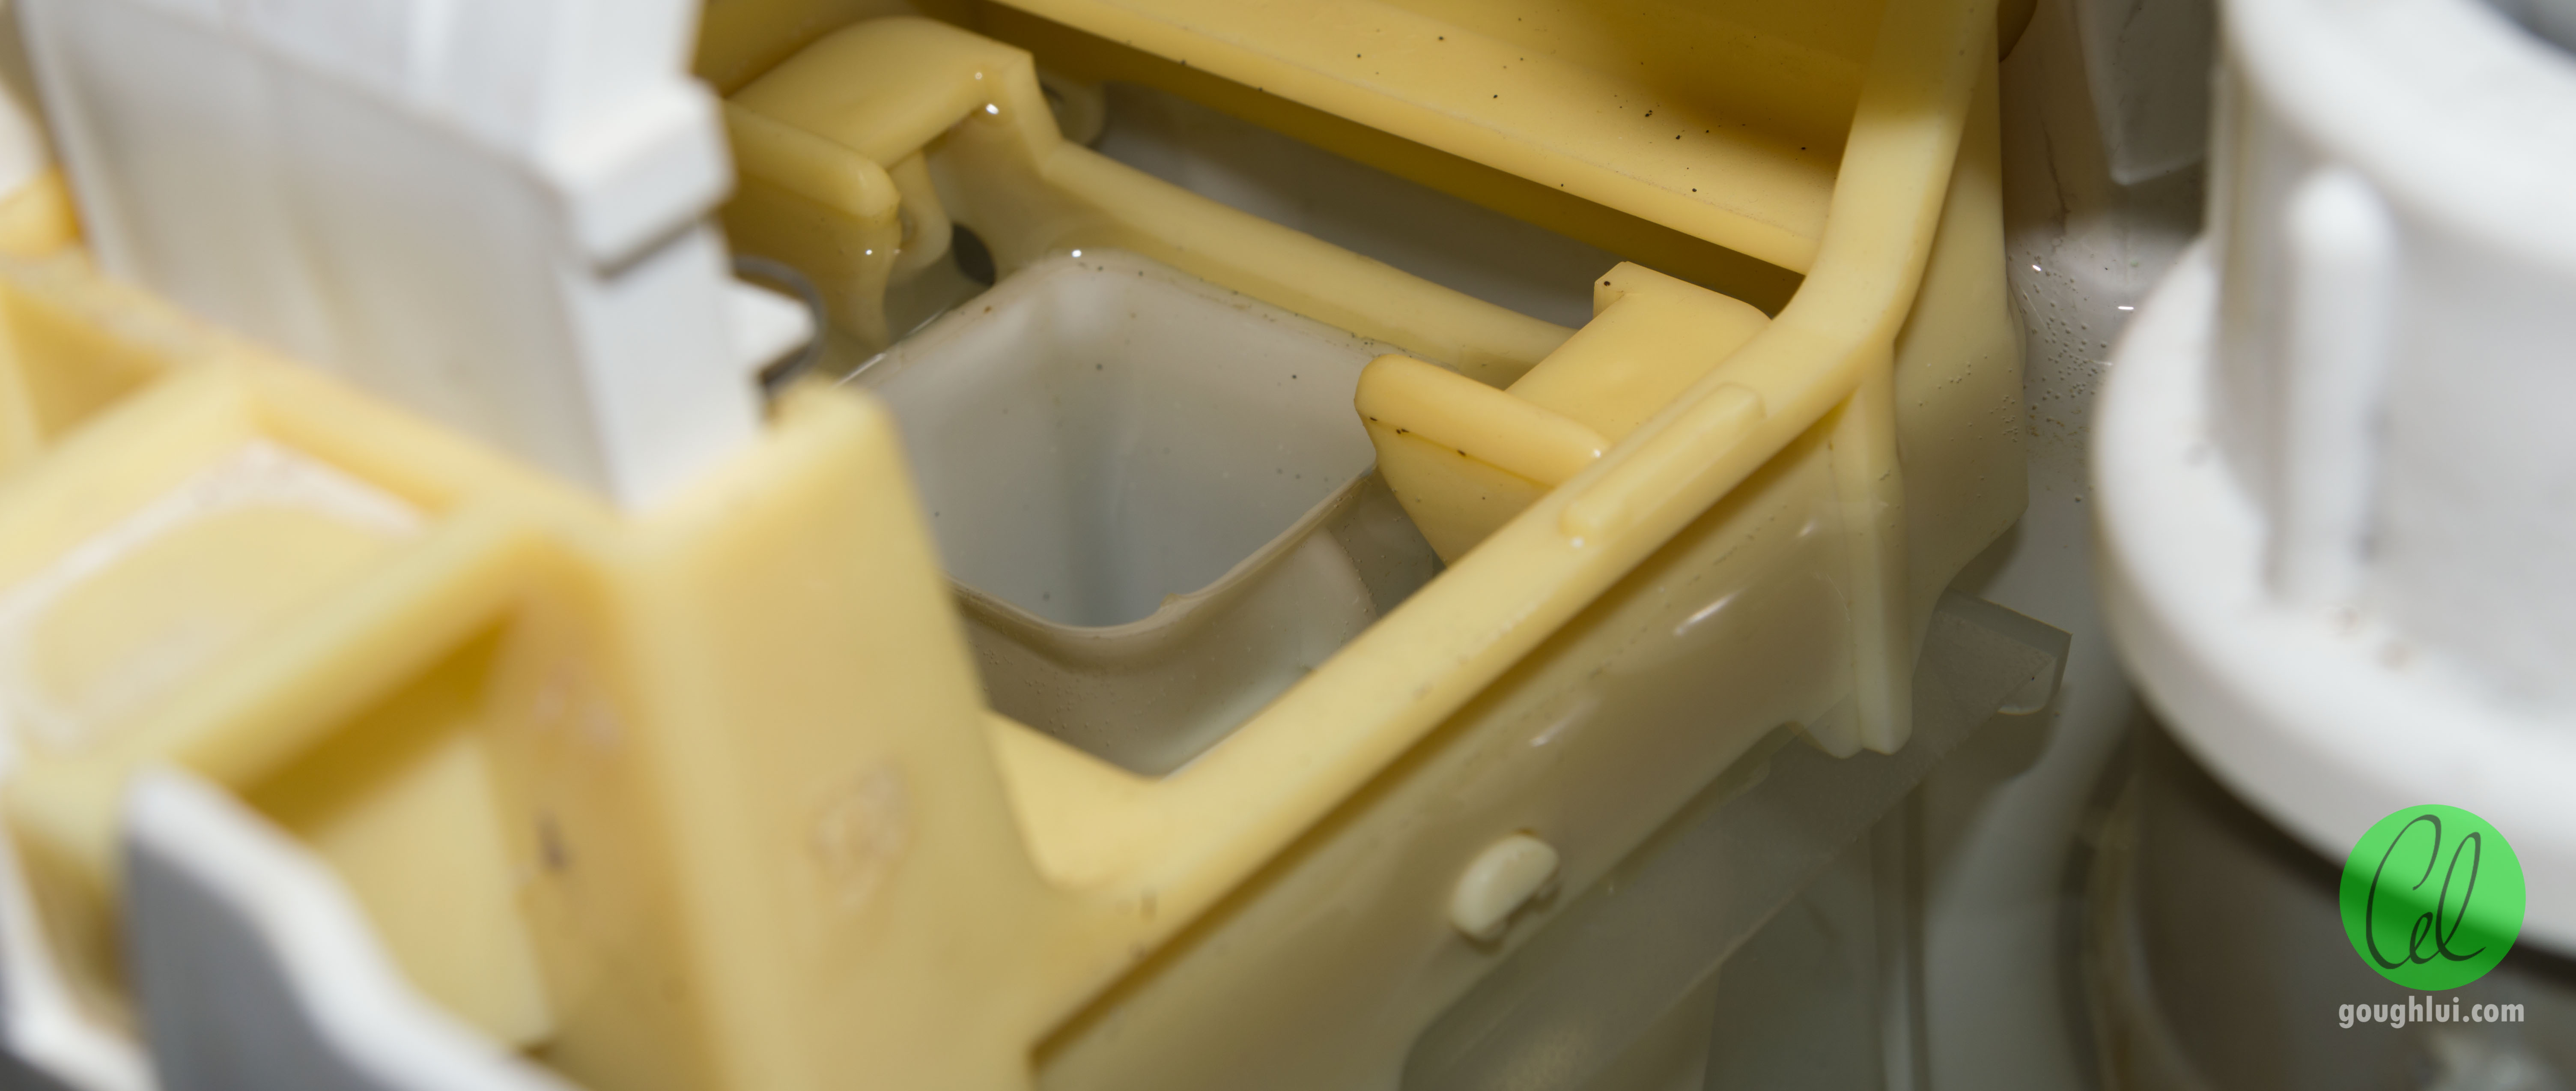
The toilet in question is a Caroma dual-flush slimline at the one at the house I live in, a frequently used one. When it started to develop a leak into the pan, it was bad news. I knew it had to be fixed eventually, or it will eventually, spiral into a headache of water-waste and expensive water bills. But what is the issue? *Pops open the lid*

A leak into the bowl can be one of two things. At first, I suspected a leaking outlet valve, mounted at the bottom of the button assembly, and it may have been a contributor initially. It is a small piece of rubber that seals around the bottom of the cistern, which holds the water in the cistern until it is flushed. That is normally nothing major, and was replaced with the help of a family friend. The problem didn’t stop though.
A closer examination showed that it wasn’t the outlet valve – it was sealing just fine. The problem resides in the inlet float valve – the grey unit on the right. We can tell this because the toilet was filling past the water level mark, and hence overflowing.

As it was a newer design of toilet, it didn’t have an external overflow drain as some do. This is very convenient as it means you don’t get a flooded bathroom in case of the valve not closing properly – instead, it drains through the centre pipe into the pan. Aha!
The initial step was to see if this was a problem with the water level setting. I twisted the nylon adjustment screw on the float arm to actuate the valve earlier and get a lower water level.
This did try to stop the valve earlier, but the valve was still quietly hissing away and slowly admitting more water until it eventually overtopped the overflow. It did save a little water by setting it more conservatively, as nobody was prepared to deal with it at this stage.
Eventually, the leak got worse to the point I couldn’t stand to watch it keep going, and I decided I was going to fix it myself (or at least, try).
Repair or Replace?
A very good question is whether I should just repair the existing valve by replacing the membrane inside, or replace the whole unit altogether. The inlet valve on the Caroma dual-flush toilets aren’t particularly notable as of being high quality. In particular, they are known to develop leaks around the top cap, and there is a shortage of information of correct replacement of washers. Some horror stories include repaired valves leaking jets of water into the ceiling, flooding bathrooms, etc. That was something I didn’t need. They are also slow, noisy and hissy.
 I suppose the biggest sway in the decision came when I went to Bunnings’ website and found a Fluidmaster Bottom Entry Toilet Inlet Valve listed for AU$19.50. This is pretty much a universal replacement fit for most bottom entry toilets, and the price was hardly objectionable when the cost of a replacement washer is about AU$4.79 and comes with a risk. Another option is the Fix-a-Loo Hush Flush Bottom Entry Cistern Inlet Ball Valve at the same price. These units would replace the whole grey inlet valve stem and should improve the performance over the existing valve.
One complication with replacing the inlet stem is that the length of the stem’s bushings might be subtly different to that of the old valve, and if you have a solid pipe leading to the inlet valve, then you might find it doesn’t fit properly. If you want to save yourself the hassles of trying to work with pipe, then the easy way out is a quick-fit water connector. I did some measuring and realized I needed about 420mm of length, so the next closest was a Kinetic 450mm Flexible Water Connector for AU$4.30, on special. It’s a cheap form of insurance and labour saving.
Tools Required
A quick think reveals that there really aren’t many tools required for this job, but it’s always good to be prepared. This might include:
- An assistant, if you’re lucky enough to have one, who should aim to keep their hands clean.
- A large wrench to undo the nuts on the connecting pipe and the nuts holding the existing valve in place. Most critical.
- A flathead screwdriver to undo the locking pin and disconnect the float arm from the old valve for convenience. You could do without this, if you wish.
- A bucket, and disposable towel to mop up any water spills.
- A pipe cutter, in case you need to shorten your pipe, but this is only required if you’re not replacing your inlet pipe with a quick fit connector.
- Access to the outdoors and a hose for hosing down the mess you are going to discover.
- A lot of wipes, cloths, paper towel and gloves to clean any mess you find hiding in the toilet.
Undergoing the Operation
Warning: You will see some pretty dirty images which might make you sick, or make your stomach churn. Do take some comfort in the fact you can’t smell what’s happening. This is your final warning to avert your eyes, or at least, maybe not look at it while eating.
Disclaimer: As usual, I will not be held responsible for what may happen to you as a result of following, or attempting to follow, these instructions – including any damage, loss or injury that may arise directly or consequentially. Use your own brain, and think of what you are doing.

The first step to beginning the operation is to turn off the water to the cistern by rotating the stopcock fully clockwise.

Then, to avoid mess, you need to drain the cistern as completely as possible by doing a full flush and holding the button beyond where the valve automatically re-seats itself. So far, so good.
Because this toilet has a fully covered design for aesthetic reasons, to get access to the bottom of the cistern requires removing the toilet seat. I highly recommend gloves for this operation, since a lot of dirt tends to linger in the areas you can’t reach in normal cleaning.

To remove the seat, you need to undo the two plastic wing-nuts while keeping a hold on the screw itself, as it will have a tendency to spin around. Of course, give these a good wash while you’re at it, because you really don’t want dirtyness when you come to fit it back together.
Carefully lift the seat forwards while ensuring the plastic screw doesn’t get lost. This should liberate the seat assembly. I recommend running outside with the seat, as it will have a lot of grime on the mounting point, and hosing it down to clean it up.
Hold your noses, because you will discover years of grime that results from liquid that has gotten through the seat, mixed with cleaning products, and possibly semi-congealed into a mess on the porcelain too.

Yes, you’ll have to clean this too, if you want to continue with the repair, otherwise you risk contaminating other parts and getting your face at it when you’re on your knees with a wrench, undoing the inlet valve.
The reason for all of this is because we need to slide down the decorative cover that “covers” the flush-pipe connection so we have access to the bottom of the cistern. Much better!

Now, it’s probably a nice time to take out the brass pin from the existing float valve, by lifting it up, and pulling it out, so you can remove the float arm to make the process of uninstalling the old valve easier.

Unfortunately, from here-on, it involves strange angles and a bit of work with my “assistant”, so I didn’t grab many more pictures of the installation, but the first thing is to undo the metal water-supply nut from this side and let it slide down the pipe. Then, while holding onto the valve from inside, you can rotate and undo the plastic nut from the outside completely, which allows the whole unit to be removed.
If you’re opting to use the quick-fit connector, you will also remove the nut from the stopcock side and remove the pipe altogether. In its place, you will hand-tighten one end of the quick fit connector on the stopcock end at just above finger-tightness in preparation for connection to the new valve.
It is at this point, you unpack the new valve, read the instructions and set it up. Start by adjusting the total length so that the critical water level mark is 25mm above the overflow level of the cistern. This is done by rotating the top half of the unit while holding the bottom part through several “click” detents until it reaches the desired length. Fit the included washer to the bottom of the valve, flat surface facing the flat surface of the valve, and install the water debris filter if necessary (not normally).
Now, we need to “fit” the valve into the cistern. The plastic outside nut should be threaded over the pipe, ready to “hold” onto the valve from the underside of the cistern. Rotate it, so it fits without any obstruction to the float’s movement or interference with the flush valve. The bottom of the new valve is about the same length as the old valve, so presumably we can continue to use the existing pipe.
Actually, hold on a sec. The design of this valve is different to the Caroma valve, and after fitting, we discovered it would not fill at all. This was because the pipe was protruding past the olive (a sealing silicone bead-shaped ring around the pipe, not pictured, also known as a ferrule) about 20mm.
This valve requires the protrusion of the pipe past the olive of no more than 9mm. As a result, the existing pipe was completely removed by undoing the bottom nut at the stopcock. We used a pipe cutter to shorten the excess length to roughly 9mm and that was sufficient to ensure it was fitted correctly. The pipe was then re-fitted to the stopcock.
Alternatively, you can just replace the pipe with a quick-fit as there is no such pipe intrusion to the bottom of the valve to worry about.
The pipe needs to be “tucked into” the valve stem itself with the olive pushed up against the valve so as to make it seal. If you are using the quick-fit, you don’t need to worry. Once the fit looks right, the plastic nut that holds the new valve in place has to be done up to finger tightness, and possibly just a little more just to ensure a water-tight seal. Do not overtighten, or you will destroy the nut or crack the cistern.
Then, the water pipe nut has to be done up to the new valve, again, just a little above finger tightness to ensure a waterproof seal. None of these connectors need, or should be used with PTFE plumbers tape – they should seal nicely.
Final Adjustment
If you’re following the instructions supplied by the manufacturer, you are requested to flush water through the valve to purge rust and other debris – but this isn’t strictly necessary if you’ve already removed the pipe completely as it should be clean.
All that’s necessary is to turn on the water slowly, and watch it as it starts to fill. Are there any leaks? No? Good. If there are, shut off immediately, and fix them!
If the valve doesn’t fill, you’ve probably hit an issue with the flow restrictor and excess piping going into the valve itself, or you might have inadvertently turned off the mains. Maybe try the quick-fit hose and the valve outside of the cistern to be sure the valve functions correctly.

Once it approaches a fill, then it’s time to adjust the water level. As it happened, fresh out of the install, the water level was pretty close – and just a little bit over the mark.

On this Fluidmaster 400UK, the adjustment is easily done by turning a plastic screw to adjust the float level when it pushes against the valve. Nice and compact, looking good!

Et Voila! The water level is just below the water level mark when it is full, just the way it should be. The new valve itself is quiet and much faster than the old one, and closes with a definite stop rather than a protracted “hissing” like the old one. In all, a great choice, and I’m sure the alternative Fix-a-Loo would be pretty similar as well.
The final steps are to reassemble the flush pipe fascia, and then re-install the seat and cover on the cistern, which are simply the reverse of dismantling them. Job done!
Conclusion
I got sick of the leaking toilet, and I wanted it fixed. As a practical person, what better way to do it than do-it-yourself. In the process, I cleaned the toilet (yuck!), and didn’t need to consult a plumber. It will save water, which is good for the environment, and save on water bills.
Surprisingly, the whole inlet valve replacement isn’t expensive at all, and the new valve seems to be superior to the old. While it might have been possible to save even more money by replacing the washer itself, I didn’t want to risk other failures – the cistern’s been around for many years, and horror stories did abound. The whole valve assembly could be had for about the cost of four washers. I suppose you can say, I took the easy way out, but it still solves the problem and it does it well. It fills quicker, and it’s quieter.
Update 1
Two weeks later, the replaced valve is working very nicely. However, it just became apparent that a second, lesser-used toilet in the house of the same model has a busted inlet valve which has been slowly trickling into the pan as it overflows.

Because I also bought the Fix-a-loo product, I decided to fit it into that toilet. The procedure is basically the same (except the valve needs to be 30mm above the overflow line, rather than 25mm), and the fix was accomplished without much hassle. Both of the valves do fit in the same cistern, but so far, my preference seems to be towards the Fluidmaster because it stops quicker and more positively when the float rises, with less of a hiss-period than the Fix-a-loo and it’s a little more compact, but that’s nitpicking. The Fix-a-loo doesn’t have a flow restrictor, so longer pipes may not be an issue in terms of sticking into the end of the valve, and it does have a superior 7-year warranty.

Goodbye inferior Caroma “stock” valves. I did try to open this one by twisting the top but it wouldn’t budge … oh well. I don’t look forward to seeing goopy disintegrating rubber … so it will just be disposed as rubbish.

This brings back memories from about 12 years ago. I had a creaky old ballcock float valve equipped toilet that had been giving fits for years with noise, small water leaks and a flush valve. I finally decided “I can do this” and got a similar Fluidmaster assembly that also included a flapper valve for the flush cycle. It took about 45 minutes to remove all the old parts and install all the new parts including tank bolts. It has been working fine ever since. I wished I had done it 5 years sooner.
Hi. I have a system like in picture for update 1. The water is spraying out continuously, even when the float tray has reached the top. Is the water supposed to only come through the little hole in the lever arm? It’s coming from everywhere at the moment!
Any pointers?
Normally, the water should only enter the cistern from the bottom of the inlet valve (grey stem where the water pipe attaches) where the slot is. Sometimes, as they age, they can also start leaking water from the top of the inlet valve where the float attaches (white ring especially). If the float has reached the top and the water still continues to flow and the adjustment screw does not help, or if the valve stem itself is leaking water from the top, it is likely that the washers and seals within the valve have failed and need to be replaced, or the valve has been serviced and not re-assembled correctly. My advice is to either repair the inlet valve by taking it apart and replacing the internal washers and membranes, or replace it with a pre-assembled unit from a third-party vendor as I have done.
– Gough
Oh, my apologies, I didn’t realize your float valve had been replaced with the one in Update 1.
This particular model is a little peculiar as it ALSO has a small drip from the top of the valve to keep the top of the float soaked in water so it is weighed down properly. This one also has a slightly slow response in that the float needs to reach the set level for a few seconds before water stops flowing. Make sure you have adjusted the height of the valve appropriately and use the adjustment screw to set the water level. Start with the screw midway, and if that’s too much, then adjust down. If you reach the adjustment limit, then you should shorten the valve and try again.
If it still doesn’t stop, there is a chance that some particulate matter from the pipe has gone into the valve and thus it cannot seal. Check manufacturer’s direction to disassemble and clean the membrane and reinstall. If it still doesn’t work, maybe try exchanging the valve or trying a different one – it could also be due to differences in water pressure as these are only rated to operate in the most common ranges – excessive or too low water pressure can cause problems.
– Gough
thanks for the tips, my toilet looks the same chroma and has the same problem, I’m hiding to Bunnings to purchase a new valve.
Thanks for the write-up! I’ll be picking up a new inlet valve from Bunnings tomorrow.
Excellent review of this distasteful repair.
One point not generally mentioned is that if you elect to simply fix the inlet valve leak with new washers (Seals) you may find little improvement.
This can be due damage or wear to the inlet moulded plastic nozzle. I don’t know how, but at least in my case, the nozzle edges were furry & so required excessive force to shut off. The ballcock even fully adjusted, could not quite shut this valve even with new washers.
You need to carefully check this – it’s easy to miss.
FYI, all you needed to do was to open the top of the inlet valve using a multi grip and replace the inlet washer. The inlet valve itself doesn’t even need to be removed. That would have taken only a few minutes at most and cost you $2.79 from bunnings or $2 from masters. Part is called Caroma 40mm No2 washer.
That’s quite right, but the number of disaster stories I’ve heard from others in regards to this put me off servicing that valve entirely. Besides, it wasn’t known for being particularly fast, quiet or reliable in general – the new valve is actually much nicer even if it is more work and a bit more costly.
– Gough
Hi my cistern is this exact model. Could you please advise how to remove the flush unit in the centre. I need to replace the rubber valve
That would be an outlet valve replacement. Completely different topic, was going to post something when I needed to get around to it (as I recently replaced the valve before posting the blog).
Basically, the central mechanism is held in place by two plastic “tabs” from the front. Applying some pressure (not so much as to crack the tabs) using a flat bladed driver should allow you to wriggle the central unit upwards and out of the cistern. Replace washer or washer assembly. Reverse procedure to re-mount. The rear part of the central mechanism slots into tracks in the rear of the cistern – make sure to line it back up when you return the unit to place afterwards.
– Gough
Thanks for the excellent write-up Gough! I’m a pretty handy woman but some things you just don’t want to go pulling apart and see what happens! I recently lost my dad who would have had all my questions answered in an instant, now I rely on blogs like yours to figure out the less common fixing issues. Most of the info on the web is not Australian and so not much use to me. Whilst I didn’t actually need to replace anything in the end, your information was a big help. My toilet cisterns had stopped filling. I live off grid and rely on rainwater from plastic tanks. One ran out of water recently and it turned out that little bits of plastic (from where my ex cut the pipe holes I suppose) had gotten through the pump (pulled that apart yesterday and removed plastic from there too) and clogged up the little inlet hole! Removed it all (was a pea sized wad), put all back together and viola…fixed. 🙂 Downstairs toilet same issue so will repeat the whole process. Thanks again.
I need to replace gasket on the outlet valve of this unit. I have the washer and it seems I need to take the bottom plug off to get the washer on but I can’t seem to get it apart…or even see where it comes apart. Can anyone help?
You don’t necessarily have to take the bottom plug off. From the last time I did it years ago, I just peeled off the washer from the whole central assembly and stretched the new one onto the same plunger. Of course, if you have the Caroma spare part, I believe that’s the whole bottom plunger, in that case I’m not sure how it is removed.
– Gough
Now that toilet has seen some shit!!
Great write up! I also used the Fluidmaster to replace the leaking inlet valve in ours too. However, over the years it also became leaky. So even the made-in-the-usa Fluidmaster still isn’t foreverlasting the no-leak replacement.
Nothing is forever … especially not at the low prices they sell them for. It also depends on how your water quality/pressure is and how often it’s cycled. Maybe cleaning the diaphragm inside the unit could help, but everything has a finite life, and sadly they don’t build them like they used to. On the other hand, my units are still working just fine.
– Gough
(From a (technically, not a) hotel in Osaka, Japan)
Hi Lui,
since your activity is still on, I would like to suggest nice topic on
P2P IP WiFi cameras, connecting to tablet via WiFi by name
and I would like to share my efforts in making 4 cams view (quad) image configuration on tablet.
In theory, only a single WiFi device can be connected to a tabl;et but I need to connect 4 real time live.
I remember your excellent project
http://goughlui.com/2015/07/25/project-adverpising-a-wi-fi-beacon-with-raspberry-pi/
so in theory and practice, 4 P2P IP WiFi cams can be connected to Raspberry Pi, feed multiplexed and broadcasted to tablet as viewer as networked video stream
Pls let me know your opinion.
Depends on how the cameras are set up, but there is nothing inherent that says WiFi can only be one-to-one.
You can (as per before) use hostapd on one Raspberry Pi to create a software based access point so that all your cameras can connect to it, and use the Rapsberry Pi to do the processing.
A potentially more simple solution might be not to use a Raspberry Pi at all and just have a hardware AP, and get your mobile devices connected to the same AP and pull images from the four cameras at the same time (e.g. could be as simple as a framed HTML page with MJPEG in each frame, or maybe some javascript based refresh).
Otherwise, an AP-less solution (depends on the camera) which might be less reliable is just to go with ad-hoc Wi-Fi mode (which basically is “peer to peer” but not one to one) so as long as all of them are in range of each other and the mobile device, you can still achieve the same thing. It’s basically the “poor man’s” AP-less Wi-Fi network, but can be less reliable especially if every device on the ad-hoc network can’t hear every other device.
– Gough
sorry, replay fails, removing Post Comment button
I was ,lucky to save replay
Maybe reply is too long ?
Great instructions! Gave me the confidence to tackle the job myself. The result was perfect, and as said a better designed inlet valve than the original (I used a Plumb It valve from Mitre 10 New Zealand). Thanks heaps!
cober each washer all the rubber with fixatap lubricant that stops the rubber going hard in a few yrs bcos the water does that and the fixatap is a barrier. Thats what i do anyway.
Finally replaced a quietly hissing inlet valve. After replacing it as well as. the metal piping that goes to the tap to the cistern with quick fit gas tubing (and teflon tape). My God!!!!! 30 minutes later and no more hissing!! What the hell was I afraid of by not doing it 5 years ago? I was even considering a new toilet altogether. Just before I went to bed tonight, I went for the obligatory wee and had to go back to make sure I flushed the toilet, it was THAT quiet. I shook my head and chuckled when I lifted the lid and found that I had. Thank you for your write up, as my cistern internals are quite uncommon to 99% of those found on the web, but very similar to yours. This fix was a breeze. Ended up using the FluidMaster, although they had the Fix-a-loo valve as well at Bunnings for still the same prices you quoted.
Thank you once again!! My sanity has been restored.
Glad to be of help. Indeed, I think I would recommend the FluidMaster valve. Out of my replacements, I had one Fix-a-Loo (which I took some photos of) but the other three were Fluidmaster. Unfortunately the Fix-a-Loo managed to get its valve stuck after about 3.5yrs of operation, while my FluidMasters are still going well. It was a simple job to swap out the Fix-a-Loo for a FluidMaster (which I did just two weeks ago) and all is well again.
It’s not only about sanity – it’s also hopefully going to make a difference to your water bill and the environment, especially if you’re in Sydney where water restrictions are being put into place and desalination output is being ramped up. It might be worth looking at the Sydney Water WaterFix program as well, as there are some good “free” repairs available for leaky taps and low-cost showerhead replacements – https://www.sydneywater.com.au/SW/your-home/helping-you-save-water/waterfix-residential/index.htm
– Gough
I have replaced the old Caroma inlet units with 2 Fluidmasters in my toilets, but have had to subsequently replace them with similar Caroma units, plus also replaced a 3rd toilet with a Caroma…all were initially working ok, then washers started tearing. Replaced 1 with VERY expensive Caroma version and all is fine. Then replaced another with a Universal version from Bunnings and while it effectively stops the inflow when full, it takes forever to fill and the water seems to actually come out of where the washer is seated?? The other one also works ok, except it will only flush for so long as the button is pressed down, therefore requiring one to “hang around” on the odd occasion for a decent flush. Nonetheless the infill does seem to work ok..any suggestions on repairing these units at all, or just replace with another….PS: That little washer was over $10 and a total new unit is about $30.
I’ve had the Fix-a-Loo version fail in the way you described – very slow fill, leaking from the washer area but only this year (four years after install). All of my Fluidmasters that I put in at the same time are still serving just fine since then. I suspect it may have to do with your water quality and perhaps some sediment or gunk stuck in the supply hose or fittings – perhaps worth checking or installing a strainer of some sort.
As for the button issue – see https://forums.whirlpool.net.au/archive/2349164 – although sometimes it’s perhaps easy to replace with a new cistern, the quality of modern low-cost hardware is dubious at times.
– Gough
Thanks Lui, I think you are correct in both assertions and not sure why I included the 2nd one, as obviously nothing to do with Caroma inlet valve. There is a fair chance that there is some sort of gunk in the other valve, as the pipes were shaking when I turned on outside hose, which may have shaken the rubbish loose off the pipes..
I have just replaced the outlet valve seal with a genuine Caroma outlet seal part and the cistern is still leaking into the bowl as before. The water flowing into the cistern does not overfill so my problem is the outlet valve. I followed the instructions and stretched the seal over the nut. However the next instruction was ‘ turn the float until the seal is centred (approx.3 turns)’ I don’t know what is meant by this float at the outlet. My Caroma is the same model as the one you have in your demonstration. Do you have any suggestions.
Ken
Are you sure the outlet seal is evenly seated on the “plunger”? I suspect this is what they mean by float – the idea would be to make sure the seal is nice and even in thickness. Sometimes you might have to refit the seal a second time. Have you ensured that the seat where the outlet valve sits is clean, free of debris and without cracks or scratches? Could the leak be somewhere else (e.g. cracked cistern itself leaking into the outlet pipe)?
– Gough
Mine is doing the exact same problem with yours. I’ve tried replacing the float arm washer but it doesn’t work. So I have to go to Reece plumbing to get a new one. I prefer Reece than Bunnings.
Maybe you haven’t adjusted the adjustment screw on the old valve the right direction. It supposed to go clockwise not anticlockwise.